Pages

Thursday, August 22, 2013

Policy Page

As I was contemplating which subject I should cover next I realized that a lot of you may have already created your website. That being said, it made me realize the urgency to remind you to make a cohesive policy page! Now your policy page is going to be custom to you and your site but it's still important to make yours clear to the buyer. 

Now if you have your own personal website, build a separate section for policies and make it easy to find. If you are on etsy there is a whole section to fill out for policies. 

These are some important points to cover:

1. Shipping:
-how often you ship (every day, every other day, once a week, etc)
-how you ship items (tracking / insurance vs. none; the name of the shipping method)
-who you ship with (canada post, USPS, etc)
-whether or not you take responsibility for lost / stolen packages
-or anything else you may think is important to note
Here is a great example:

2. Payment:
-what payment methods you accept (credit cards, e-transfers, paypal, etc)
-if you offer layaway or not (some shops will offer layaway on items over $100, some will offer for any items, and some don't offer it at all)
-if you are going to be charging tax and if so to who / what states / provinces. 
-holds and how long you are willing to do them for (if at all)
Another example: 

3. Refunds / Exchanges
-do you offer either of these things at all
-if so what are your requirements; will you refund someone if it didn't fit? if they didn't like it? or only if there was something wrong with it? will you exchange items? if so how many times? 
A great example:

4. Additional information:
-do you make things by hand? do you do custom orders? maybe mention that every piece is going to be slightly different
-basically anything else important you think someone should know before purchasing from you! 
Last example:
Hope that helps! Please comment with any questions or advice!

Wednesday, August 14, 2013

How to use Instagram to your advantage!

The last post I did about instagram only really covered how to use the actually program, but not how to make it work for you. Today I'd like to go over how to make it work in your favour. 

First things first: Build a community! 
So there are a few different ways to have people discover your account. First off all, make sure you include it in your facebook page, website, etc by saying follow me on instagram "@instagramnamehere". Remember to put that "@" symbol in front of your username when sharing your account information. 

Next, tag your photos! You'll quickly learn over time some of the tags that are specific to your line of work but you can always start with the basics. For example if you are showing off a piece of art you just finished of a landscape you could tag it: #painting #landscape #watercolour #art. Remember to put the "#" symbol in front of the word. 

(this is a great example because if you look at the image she took, it's a great example of the kinds of things to post! She makes adorable cards and is in the process of photographing them as well as giving you an update on what she's doing for her site / business! )

Now that you've tagged things, search similar tags and start following, and liking images from those who post similar things, or an interest in those things. 

From here click on the section and scroll through the images. Like the ones you like, find out who took them, and maybe even start following them! That's how to get discovered by fellow art lovers, designers, vintage enthusiasts, etc! 

You can also look up all of those shops, people, designers, artists and they will likely have their instagram name somewhere for you to find so you can search them and start following them! 

This is what it will look like when you search someone. Just click on the one that you think is correct and start following them. Sometimes liking a few of their images will also catch their attention and may start following you in return! 

Another thing to know, is that you will get notifications every time you sign online and someone has either "liked", commented, or started following you! How to check this is by clicking on the heart 2nd to the right and it will show up with a scroll bar. Try to respond to the people that comment on your things. Especially if they are asking a question or giving a compliment! You can do so by responding with @whoevercommented and then type your message. That way it tags them to know they have been replied to! 


Instagram is also a great place for "promotions", "special codes", and off sales. If you are having a sale then create a picture with all of the information and post it! Share it with all of your followers! 

This is a great example of letting your followers know you're having a sale! 

Now, I've given you a lot of information so far, but one last thing! Here is a list of free and super cheap editing apps to help with your photos!! Sometimes it's worth paying the $1-$2 to get the updated versions for more options. 

The first app being "PicStitch" which is either free for some collages, or $0.99 for a huge variety! I personally enjoy having a huge variety of options but it may not be necessary for you!
Pic Stitch provides a collage like square so that you can show off multiple items / pictures at once! This is useful when you want to show off detail shots of a new painting, an outfit post of new items, etc. 

The next app I enjoy is "over" or "overgram". Overgram is the free version but it will say "overgram" on top of all of your images. If you download the paid version which is $1.99 you will avoid having "overgram" written on top of your photos. 
This app is useful when you need to give you followers information that they might over look if it's written below an image. For example if you're having a sale. You can either just write SALE or you can have more information like the image a few above. 

Lastly, I love this app for editing: Afterlight! Now this app is $0.99 but it's very worth it. It's basically a mini photoshop for your phone. It has so many options to make your photo look more professional.
My favourite feature to this app really is that I can post full length images without having to make them into a square by adding white on either side. This is useful when you have a full image shot that really doesn't look good cropped into a square!! 

So this is it for now, but I will keep doing quick little updates when I learn more, as well as when I discover more free / affordable apps! 


Thursday, August 8, 2013

Tips and Tricks

Since the last time I posted I’ve been able to reach a point of steady sales which I began to discover was largely influenced by a few factors:

Number 1: Instagram!


I never realized just how important this app could be until I started getting direct sales from it. The last informative post I did was about Instagram but as I’m realizing, there isn’t enough information in that post and plan to elaborate in the next one. Most importantly, think of your Instagram as another online shop so don’t post bad photos. Still think of it as somewhere to post well-composed inventory shots as well as life photos. But remember, when I say “life photos” it still has to pertain to your business and be related to what you are selling. For example: if you sell handmade jewelry, feel free to post a picture of a friend wearing it, or a photo of your studio, or even a photo of you working on your next piece. I will go into this in further detail in the following post as well as including some leads to free photo editing apps!

Number 2: Building a Community!


 This is something I’ve been building through instagram personally but can be done through blogs, forums, or in person through markets, and networking. It’s always useful and fun to communicate with others who are into your world anyways so why not? For me it’s the vintage world where we talk about vintage clothing and history as well as learn new things from each other. This can benefit our businesses or personal knowledge whether it's running a shop or maintaining a blog! For some of you it will be the art world, the fashion world, or maybe something else all together but it’s good to find like-minded people with the same interests to communicate with. 

Number 3: Have a Policy Page!


 Some of the issues I’ve had to deal with recently pertain to not making my policies clear enough. I will do a full post about Policy Pages and what they should include but you should know to at least have a policy page and it should include: payment methods, shipping, returns, exchanges, as well as other things like layaway and reserve policies.


Number 4: Don't panic over slow sales!


 One of the things I can personally find myself struggling with is either panicking or feeling like a failure when sales slow down. But I’ll tell you right now, it’s not worth beating yourself up over! Take that emotion and turn it into drive by putting it towards new goals and working harder! In this economy you have to expect slow months! It is not always your fault if things are not selling so don’t be hard on yourself. I will also go into this further as a separate post and go more in depth about how to turn wanting to give up into working even harder! 


***all images are from google and are not mine.

I'm back!

Hey Folks, I apologize for the lack of posts over the last couple of months. Rest assured this blog will be continued and updated more consistently starting today! In the past three months that I have been away from this blog, I have picked up and personally experienced new tricks, do's and dont's, as well as information that will help you with your online business. 

The next post will be a little post about some of the small tips and tricks I've picked up and then afterwards I will continue with the blog as I had left it. I will be continuing with the information on free marketing I had started and then will work my way up to bigger discoveries like how to have your own website the affordable way without having to compromise professionalism or individuality. 

This is just a quick update post! I hope to have the following post up by tomorrow! 

Monday, March 25, 2013

Free Marketing - Instagram

For instagram it seems that you do need a smart phone that accepts the app. Luckily the app is free on the app store! I have made some screen shots from my phone to explain how it works. Once you've downloaded it to your phone and made yourself a little profile it should look something like this:
Make sure you mention who you are as a business and add your website in there! Next you're going to want to post a couple of pictures relating to your shop which I'll show below. 
You can choose to either take a picture with the camera on instagram or you can choose from your photo album on your phone. 
If you'd like to have some fun you can choose from a number of filters that edit your photos for you. When you're done click the arrow to post the photo.
From here you should link you instagram to as many of your other social networks as you can. Once you have, click on them every time you post an image so that more people can see them! It the description you want to put "hashtags" which help people search for related posts. Hashtags start with "#" followed by a word like "#handmade". When you're done your post should look something like this:


Now that you have a couple of pictures up it's time to start following some people! It's smart to follow other people and like their pictures because it shows you care about other shops and such as well. You can search for your favourite shops or hashtags that relate to your shop or interests.

You can search with the little navigate icon at the bottom!

Next we'll go over tumblr!


Tuesday, March 12, 2013

free marketing - blogger

Before getting started with your blog the first thing to do is a little brainstorm! By now your shop should be up and running and have a look or theme that is very true to your shop. Remember to keep that consistent with your blog as well. Brain storm the following key points:

1)   Title – often your shop name, or something similar and remember it may be taken, so think about how you can modify that name to still be consistent
2)   Appearance and Layout – Make sure it is consistent to your shop and your other sites. Think about color schemes and branding
3)   What to blog about – try to come up with a good idea of what related things you are going to blog about and how often, keeping consistent is key!

So now you should have a better idea of what your site will look like and it is time to get started!

Today we are going to be creating a blog with blogger, which is run by Google. If you do not have a google / gmail account you can log into www.gmail.com to sign up.  There will be an icon on the top right hand corner that says: “create an account”.  Click on it and continue to fill in all of the information. Once you are set up or logged in, you can either click on “more” and find “blogger” or you can go to www.blogger.com.
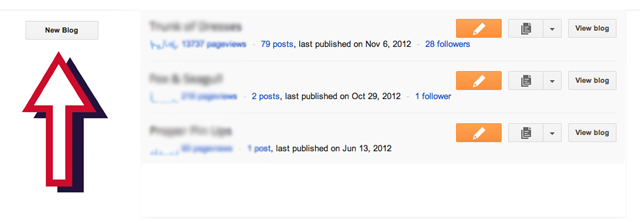
Now that you are on blogger your page should appear something like this:

*Note I already have a few blogs so those side icons may not show up for you. The important part is where that arrow is pointing.
Click on the button on the left hand side that says: “New Blog”.

This screen should then pop up:


There are three easy steps that go as follows:
1)   Type in the title of your blog for example “A New Start”
2)   Type in what your actual URL address will be for example “anewstartonline” because “anewstart” was not available. Make sure that there is a checkmark beside your address and clearly states “This blog address is available” underneath.
3)   Once you have figured out all of your titles, just simply click on “create blog” at the bottom!

Here comes the fun part! Designing your template! 


Once your page is completed there will be an arrow you can click on which will give you a few options. Click on “Layout”
Now, you are welcome to start with this page but I always find it more fun to start with the “template designer”.

A screen like this should appear and there will be a few options for templates. The bottom part that says: “No posts found” is where the examples will appear to how your site will appear.


If you find this stuff complicated I recommend clicking on the “simple” layouts and find a simple color scheme.

On the left hand side there are also some other options to play with, including font, color, sizing, etc. We will go over all of that another time (potentially next week) but for now a simple start to a blog is the goal of this post.

To apply all of the changes you have made please remember to click on “apply to blog” in the upper right hand corner.

Now that your basic set up is complete; it’s time to head back to the main page by clicking “Back to Blogger”.
Now it’s time to create a small profile so when visitors come to your site they can find out a little more about you. Click on your name on the upper right corner and this screen should show up. From there click on “blogger profile”.

In the next screen in the same place it will say “Edit Profile”. Click that!

Now that you are on the edit page, feel free to fill in any of the information that you think would be important for others to know, that you are also comfortable sharing. Do not share any personal information that you are not comfortable with!


The most important thing to fill in is “Introduction” which is in the “extended info” section near the end. This is where you can accurately describe yourself and what you do. Some things that may be important to mention in your introduction;

-Your name
-Your business name
-What you sell / make / create
-Your background (education, experience, skills that make what you do your passion)
-Anything else you think describes you and your work!
It may also be fun to fill out any of the other boxes so that your readers can get a better idea of who you are as a person behind your business! The introduction section will appear on the side of your page when people visit your site.

It is also a good idea to add an image to your site. This can either be your logo, an image of your face, or something related to your business. Just click on “choose file” and upload a picture from your computer.
When you are finished do NOT forget to click on “save profile”