Pages

Friday, March 14, 2014

Pinterest

Using Pinterest for free marketing!

What is Pinterest? Pinterest is a website full of images. Remember all of those inspiration boards and collages you made as a kid from old magazines and newspaper clippings? Well, this is the online version! You can have different "boards" for different subject matter. Many businesses including large brands like Saks Fifth Avenue have started using this site as a marketing tool!


So first of all after creating an account - make this account about your business - it can have some personal interests but don't go too far - make a board for your shop for example: "Freaky Friday Shop".


Most boards afterwards should be things related to your business and lifestyle. If you want to have other boards for yourself you can have "private" boards that only you can see! 

The next few pictures will both show how to create a board and how to make a board "private" if you so choose!


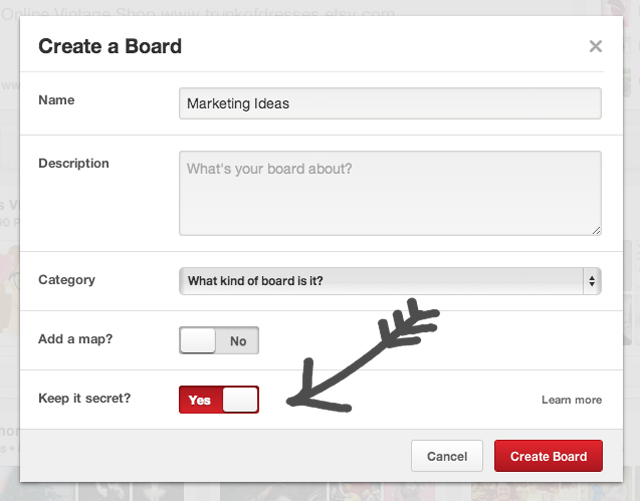

Now, you're probably wondering about the other options, and how to pin! The top option as seen in the image above, is to "upload a pin". This is to upload a pin from your computer. Pretty simple. The next one is "add from a website". This one is also pretty simple. Grab the URL from the website or the image itself and type it in. It will then pull up any images it can find. You can then pin whichever image you desire onto whichever board you where planning to.

Some tricks:
Want to pin your etsy items? This will upload your main photo for your etsy listing. It will also link to your listing if anyone clicks on the image!


Okay, but what if you want a different picture from that listing? Good question!

First you choose the images and right click on it. Click "copy image URL". Then upload from website on pinterest. Copy / Paste it in, choose the image and pin it to the appropriate board. 


Once you've pinned the image to your board, go to that board and find the image. Once you've found it click on that little button on the right that looks like a pencil. It's the edit button! 


Then go back to your original etsy listing and copy paste the listing's URL into the website location. This way it will still link anyone who clicks on the image to your etsy listing. Otherwise it will just link to your image with no ideas of where to find the item for sale. 


Also, start finding that community of businesses, friends, acquaintances that are all related to your business and follow them. You can also choose to un-follow any boards you are not interested in seeing on your feed. 

The point of this website is to get people to see your images and "re-pin" them onto their boards. The further that image can travel, the more chances of sales and general traffic to your shop. This can lead to sales so it's worth spending a little time on, at least when you have new product to introduce. 

Some little things

 I was recently thinking about some little things that may help along the way but are not big enough to write a whole post about!

1) Another shipping option: shipping in the states. Depending on where you live, if you are close to the boarder (relatively) and have a high volume of sales, it can be a lot cheaper to cross the border into the United States and ship from there. If you do so, go once or twice a week and make sure your policies state how often you go.

2) Finding Facebook groups in your world. For me, I found a couple of groups for vintage lovers and I often post new items on the group and make a few extra sales that way. Just search tag words related to your business and see what you find! Again, it's good to be part of the community!

3) Make sure you've been keeping your finances organized. Keep all of your business receipts, keep track of all your business spending, and all of your sales. Also keep track of what you've been spending on shipping because you may find in the end that you've spent a little out of pocket on it and that should be written off in your end of year taxes. 

Friday, March 7, 2014

Customer Service - Negative Feedback

Hopefully, you will never have to deal with this: negative feedback. However, there are crazy people out there that are simply never happy with anything and don't realize what effect their feedback has on you and your business.

So how do you deal with this? 
Calmly.

If you are anything like me, you will get really upset, want to cry / kick / scream / etc! So if you've noticed negative feedback and you start feeling this way... wait. Take a walk, calm down, wait until the morning. Even open up a typing program and write down all of the things you wish you could say to them. (but don't - and don't even do it in a message to them thinking you'll erase it because you don't want to accidentally send it) Once you've calmed down, then deal with it.

Remember, you still want your customers to be happy, and luckily a customer can change their feedback so try to make them happy.
I will say that some customers will never be happy. - I once had a lady convinced that the dress she bought was cream and not pink like described in the listing... the dress was pink. Some people just don't get it, or want to be picky. 

Obviously each negative feedback will be over a different issue and will need to be dealt with differently every time. The important thing is too stay calm, and ask them what you can do to make them happy with their purchase. Whether that be a return, an exchange, a discount on a future item, etc. Even if it is their problem, or their fault they are having this issue, don't remind them of that. Keep things neutral. Just remember that confrontation will keep both of you upset and can escalate the problem further. 

Hopefully by the end you will have come to a happy conclusion and they will have changed that feedback. Yes, in the end you may have had to make a sacrifice or two, but your feedback is worth it! You want people to trust you as a seller!

What if nothing I do pleases them? 
One more lucky thing that etsy has done recently, you can now leave a public response to their feedback. Don't leave this feedback until after you have tried to resolve the issue because once you've commented they can no longer change their feedback.

In your public response remember to explain the situation and defend yourself but do not get angry. You want people to know that you've done everything to rectify the situation and it's the customer who wasn't cooperating. 

Hopefully that helps, it's always a bummer when it happens but it can be fixed!! So no giving up! :) 

Shipping at Home - Online

Tired of walking over to the post office all the time? Well there is a solution! You can actually do all of this at home!

What you need:
-To sign up with Canada Post (which is what we will be going over in this post)
-a credit card or pre paid credit card
-Shipping supplies including:
-envelopes or boxes, tape, the packaging you use for your products, scissors, packing tape, etc
-a printer with black ink (so a laser printer works as well)
-paper
-a scale that measures in grams or kilograms
(I found mine in a thrift store which is not uncommon ((so keep your eye out)) otherwise you can find them at "nood" - http://www.nood.co.nz/betty-scales.html)

Making yourself a little shipping station with a little table and somewhere to put all of the supplies is usually helpful I find. 

So let's start off with signing up for online shipping! **I'll note that while you sign up, also sign up for a "venture one" card! They are free and they save you money on every item you ship and you gather points as well!

First you are going to click on "business" in the upper right hand corner. 
When you scroll down the page you will notice these options on the right hand side: click on "ship online"

Next you will choose "EST Desktop 2.0" by clicking "get started"
Next you will see this page which gives you the option to sign up. Fill in your information and remember to register for a "venture one" card!
Once you are all signed up you will see this page for now on to sign in from:
This will lead you here: which you will then click on the first option that says "EST - Electronic Shipping Tool"

Which then leads you here where you can finally begin to ship! Choose the destination you are planning to ship to (this can be changed for every individual order)

Then from there you will continue to fill in all of the information needed. You will also notice that on the side there are a few options for other places to ship, so you can always click those when you need to change shipping locations. All of Canada is grouped as one, all of the USA is grouped as one, and then everywhere else is grouped together.
At the bottom you will notice that it needs the size and weight of your package. 

So at this point you should already have it packaged up. This is usually how I get all of my information ready before even logging into Canada Post:

First of all I write the name of the customer on the package so I do not get them confused with other orders. I then put them on my scale to get a weight.

I then write it below the name then proceed to measure the size of the package. You will need the length, width, and height of the package.

By the end it has this information on it: Name, weight, and measurements.

Now that you have the info you need, you can finish filling out step one. Now you're onto step two and you must pick a shipping option. Sadly it does not give you the price until the end but you can always go back and change it before purchasing.


Next step is to fill out the customs form. Make sure to fill it out to the best of your ability as to not have it held up or have any troubles at the border. If you are shipping within Canada, you will not have to fill out this information.

Lastly, it's time to pay. You should hopefully have your credit card all set up to pay which you then fill in the info here. I personally had some troubles syncing my credit card to the payment so if you have any issues call the Canada Post help line and they will guide you through it!

Lastly, print that label out and tape it onto your package. Be careful not to bend or wrinkle any of it - especially the barcode!

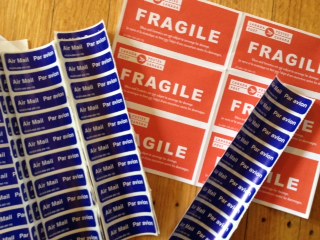
Also, next time you stop by your local post office, ask if you can have a handful of "air mail" stickers and "fragile" stickers (only if you need the fragile ones).
They should give them to you. So anything you mail out that isn't going as "surface mail" should have one "air mail" sticker on the front and one on the back of every package. This way it gets mailed out correctly.


Oh, and the true last thing to do:
Slip your packages into your local post box! 
Now, if your item is too big to fit in a post box, then you can take them over to your local post office and drop them off there. Luckily, since they are already paid for, you do not have to wait in line and can just hand them over to the person working. 

You can not print out normal post - the equivalent of a stamp online so if you need to send things in this method just pick up a book of stamps. 


Thursday, February 27, 2014

Giveaways part 2

So we have gone over only a couple giveaways that I have seen be successful although it's important to know that there are many many others.

Secondly, we did not go over what to include in a giveaway.

That is partially up to you. You can choose a specific item you are giving away, or a dollar value. You can even choose a dollar value for a specific area / section in your shop. The giveaway does not need to be over the top, although it should be enough to make people interested. 


Here is an example for instagram:


Here is an example for Facebook:


Wednesday, February 26, 2014

Giveaways part 1

There are many ways and kinds of giveaways. 

Different giveaways will bring in different types of attention whether that be to your shop directly, to gain new followers on instagram or facebook, but in the end it's all to gain more sales. 

Here are just a few examples of giveaways that I commonly see etsy users using. 

1) a giveaway through a popular blog
-this can mean a few different things: when I did this, the blog did a feature on my and my shop with an interview and had a giveaway at the end.
Some blog giveaway just have a quick description of your shop and then explain the giveaway details.

Remember to include a related grasping photograph and links to all related sites. Most times when you do a giveaway you should have part of the entry requirements be to like your site on at least 1 or 2 specific social media sites followed up by admiring your shop online. 

This will help bring attention directly to your shop as well as your key social media outlets.

2) a giveaway through instagram or facebook
-create an image that will attract customers, put a text on that image with the giveaway details. Make sure if it's through instagram to have them both tag @ and # your shop's tag name. 

If you are doing a giveaway yourself, make sure you truly pick your winner at random. 

I saw one shop I follow recently go viral with their image on instagram. I thought it was brilliant. 

This method of giveaway will help build a bigger audience on your instagram or facebook. These are great because it is where you should be posting all your updates which will lead them to your site. 

Tuesday, February 18, 2014

Customer Service

So this subject of customer service will come up again and again. I will basically be posting about it in parts. Today I'm going to go over some of the basics and how to deal with difficult people.

The reality is, just like in any business, you're going to find difficult customers - especially on etsy.

You will eventually get used to having to answer tones of questions, including having to go out of your way to take additional photos / measurements and then have them never reply or purchase from you. But it's important to do it anyways, because it does often lead to a sale and you don't want to miss out! (side note, if you commonly get asked about a specific measurement or photo maybe it's time to start including that in the future so you don't get the messages anymore)

You will also have to get used to people trying to haggle. Sometimes, especially if they are buying a lot of stuff, or a repeat customer it's nice to give a bit of a discount (but that is entirely up to you as the seller). Only you know what you can afford to do. You will also find people trying to haggle over the price of one item, and again that is up to you if you accept it.

 The hardest thing I personally find, is when someone tries to low-ball you. For example: "Would you take $5?" when the item is listed for $100. The reality is, you don't even need to respond. If you'd like to, stay polite. Just say something as simple as "thank you for your offer but I have to pass". It's one of those things where you will want to say "HECK NO, WHAT IS WRONG WITH YOU? DON'T YOU KNOW I WORK HARD TO EARN THIS MONEY?" but that only causes confrontation. So again, either be polite, or don't bother responding. They know what they are asking and they know it's rude.

You will also notice that no matter how blunt you've made your policy page about returns / exchanges, and so on, people will buy something and want to fight those policies. Especially if they are unhappy for what ever reason. So again, it's important to stay calm and polite. Remember, they can leave you negative feedback regardless of whether or not they are in the wrong.

That's not to say you can't reinforce your policies and send them the link to your policy page. Sometimes, if they are being really pushy, it is best to find a middle ground you are both happy with even if it's outside of your policies. In the end you really do want your customer to be happy, and you'd like them to come back again. 

I will continue to go over other pieces of info & advice surrounding the subject of Customer Service.