Pages

Tuesday, March 12, 2013

free marketing - blogger

Before getting started with your blog the first thing to do is a little brainstorm! By now your shop should be up and running and have a look or theme that is very true to your shop. Remember to keep that consistent with your blog as well. Brain storm the following key points:

1)   Title – often your shop name, or something similar and remember it may be taken, so think about how you can modify that name to still be consistent
2)   Appearance and Layout – Make sure it is consistent to your shop and your other sites. Think about color schemes and branding
3)   What to blog about – try to come up with a good idea of what related things you are going to blog about and how often, keeping consistent is key!

So now you should have a better idea of what your site will look like and it is time to get started!

Today we are going to be creating a blog with blogger, which is run by Google. If you do not have a google / gmail account you can log into www.gmail.com to sign up.  There will be an icon on the top right hand corner that says: “create an account”.  Click on it and continue to fill in all of the information. Once you are set up or logged in, you can either click on “more” and find “blogger” or you can go to www.blogger.com.
Now that you are on blogger your page should appear something like this:
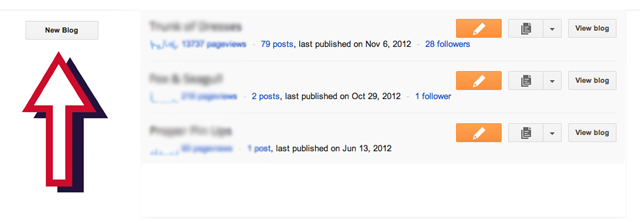
*Note I already have a few blogs so those side icons may not show up for you. The important part is where that arrow is pointing.
Click on the button on the left hand side that says: “New Blog”.

This screen should then pop up:


There are three easy steps that go as follows:
1)   Type in the title of your blog for example “A New Start”
2)   Type in what your actual URL address will be for example “anewstartonline” because “anewstart” was not available. Make sure that there is a checkmark beside your address and clearly states “This blog address is available” underneath.
3)   Once you have figured out all of your titles, just simply click on “create blog” at the bottom!

Here comes the fun part! Designing your template! 


Once your page is completed there will be an arrow you can click on which will give you a few options. Click on “Layout”
Now, you are welcome to start with this page but I always find it more fun to start with the “template designer”.

A screen like this should appear and there will be a few options for templates. The bottom part that says: “No posts found” is where the examples will appear to how your site will appear.


If you find this stuff complicated I recommend clicking on the “simple” layouts and find a simple color scheme.

On the left hand side there are also some other options to play with, including font, color, sizing, etc. We will go over all of that another time (potentially next week) but for now a simple start to a blog is the goal of this post.

To apply all of the changes you have made please remember to click on “apply to blog” in the upper right hand corner.

Now that your basic set up is complete; it’s time to head back to the main page by clicking “Back to Blogger”.
Now it’s time to create a small profile so when visitors come to your site they can find out a little more about you. Click on your name on the upper right corner and this screen should show up. From there click on “blogger profile”.

In the next screen in the same place it will say “Edit Profile”. Click that!

Now that you are on the edit page, feel free to fill in any of the information that you think would be important for others to know, that you are also comfortable sharing. Do not share any personal information that you are not comfortable with!


The most important thing to fill in is “Introduction” which is in the “extended info” section near the end. This is where you can accurately describe yourself and what you do. Some things that may be important to mention in your introduction;

-Your name
-Your business name
-What you sell / make / create
-Your background (education, experience, skills that make what you do your passion)
-Anything else you think describes you and your work!
It may also be fun to fill out any of the other boxes so that your readers can get a better idea of who you are as a person behind your business! The introduction section will appear on the side of your page when people visit your site.

It is also a good idea to add an image to your site. This can either be your logo, an image of your face, or something related to your business. Just click on “choose file” and upload a picture from your computer.
When you are finished do NOT forget to click on “save profile”


Tuesday, March 5, 2013

twitter

Next is Twitter! 

Twitter is good for posting updates about new items in the shop, or any other shop announcements! 


Go to www.twitter.com and fill in the section that says "new to twitter?". You will be able to edit your profile and such but you will still need to confirm your account by checking your email and following what it says!


To edit your profile click the little gear icon and the drop down menu and then click "edit profile". 


Here you can fill in all of your important information and add a profile picture. At the bottom there is even an option to connect to Facebook! It's a great idea to hook this up to your facebook page and not your personal facebook. That way all of your followers can also see your updates over facebook! 

facebook page

So lets start with facebook. This one is good because you can send a request to all of your facebook friends to like your page which then makes it appear that you already have a large following! 

On the side of your normal facebook page should be a section called "Pages". Click on the last thing that says "like pages" and there will be a button at the top in green that reads "create page". Click it! 


This will take you to this page. There are 6 sections that you can choose from. Depending on what you are selling; "Local Business or Place" or "Company, Organization or Institution" will be your best bet. Local Business or Place is really only good if you have a physical store as well as your online shop. If you are only selling online, use "company, organization or institution".


Chances are "retail and consumer merchandise" will be the closest match to what you are selling. Please take some time to look through all of the options incase something matches better though!
Choose an image of your logo, or a product photo that relates to your shop! Once you're done you will also get to choose a "cover photo" so think about what two images will go nicely together. Examples at the bottom of post! 


Facebook ads do cost money so this part is up to you whether you want to look into it or not! (the facebook page is free don't worry)


Lastly, here are some of the things you will notice on your new page. At the top is your tool bar where you can edit your page, or build an audience, etc. There is also a section that will eventually come into use called "insights". This section helps you monitor your statistics! You'll also notice a little thing that says "invite friends". It's a great idea when you get started to click that and invite all of your friends that you think would support you! That way you can start building your audience! 

I also thought I'd mention how to navigate between your normal facebook and your business facebook page. Click on the little icon next to your name and a drop bar will come down. Under "use facebook as" should show your new page! All you have to do is click on it and you will then be using facebook as your shop. Do the same thing to get back to your normal facebook. 

Here are some examples of nice looking facebook pages for companies. 


Next will be Twitter!

Sunday, February 24, 2013

free marketing

Now that you have your site up and running it's time to advertise yourself! Let's start with the free marketing options that are out there! The great thing about most of them is that they are all connected and you can often post on one medium and have it show up on multiple sites. 

Some of the major free marketing websites:

FACEBOOK - www.facebook.com - on facebook you can create a separate page for your business. It is important to keep your personal life and your work life separate. You can use the same image as your banner for your "cover photo" and such. It's a good idea to keep it looking consistent with your website. You can even add things like "shop", "pinterest", etc to your facebook page to easily navigate to your shop. 
Example:

Blogger - www.blogger.com - blogger is a website powered by google that allows you to have your own blog. Having your own blog is a great way to advertise yourself. Depending on what you sell will depict what kinds of things you should post about. Make sure it's always related to your product. So if you make clothing you can have "upcoming stock", "just in", "editorial shoots", "how it's made", etc. 
Example:


Tumblr - www.tumblr.com - If you'd rather just post pictures with very little wording this is another great blogging site. You can also put a link to your website / shop site with all of your work so when people see it or re-post is they can always know where it came from!

Twitter - www.twitter.com - Twitter is a site devoted to updating statuses basically. So it's words only but you can post links to photos or web pages. Twitter is a great social networking site that helps you connect with like minded people as well as customers. This is where you can tell people about your upcoming sales, you new products, or your future plans for the shop!

Instagram - www.instagram.com - most people use this as an app on their phone. You can take pictures of the things you are doing and post them on your account. You can then write a little description and hashtag it with related words to find more followers. 
Example:

Pinterest - www.pinterest.com - this is a site full of images of anything and everything. You build folders called "boards" and pin images to it. In this regard you can post the images from your store with links to your shop when they click on the image. Then hopefully you'll get you image re-pinned and it will start to float around the internet! 

An important key to using all of these sites is being part of the community. You can't just start one of these sites and expect to have a million followers. You must post on other people's blogs, or posts. You must start following them yourself and show that you are interested in what other people are doing as well. 

Now there are many other useful free marketing sites but these are the most popular ones currently. I will go through these one by one on how to actually set them up and use them to their fullest potential! :) 


Wednesday, February 20, 2013

listing on etsy

Luckily etsy pretty simple to navigate through! To start off, click on the upper right corner where it says your shop name. A drop menu will come down and I want you to click on "add new item"
Next there are a lot of drop down selection boxes. This is to help narrow down people's searches. 
1) who made it? what is it? when was it made?
2) what is it? what type? what type? (it's good to fill in as much as you can!)
3) variations - this is if you are selling a product with different variations. 
4) here is where you upload those photos you took!

Make sure the title has an accurate and simple description of what the item is. In the description it can be helpful to have a little "form" to fill out every time. Something you can copy paste. Just make sure to include a good description of the item, the size, and condition. Most of all don't forget to add your item to a specific section in your shop!! 

 You can also fill in "recipient" or "occasion" or "style" which just helps narrow searches! The most important thing to fill in is "tags". These are the key words that help your item show up on searches. 
 Next put a quantity amount. Do you have multiple of something? Or is it a one off!? Next you are going to fill in where you are willing to ship to as well as how much it's going to be to ship to those places. Going to your post office and getting an estimate is a good way to start until you have a definite idea of cost. 
Once you're done you can "save as draft" if you're unsure or you can review your item and keep editing it until you are happy with it. Otherwise click the official "publish"! Etsy will charge you .20$ for that listing that you will have to pay at the end of the month. 


Once your item is listed you can let every one know by posting it to your facebook page and your twitter account. We will go over how to set those up soon! But they are a great way of doing free marketing! 


Friday, February 8, 2013

Ebay Set Up

Alright! Today is the quick tutorial on how to register an account on ebay and then list your first item! 

This page will show up and you will do exactly what it says, fill it out as accurately as possible! When it comes to creating your user ID, try to create the same or at least similar to your brand name. 

Now let's list your first item!
At the top right corner you will choose "sell" - "sell an item"!

First fill in the item's title! Make sure the first part of title has the most important part of the description! If it's vintage, make sure you say it's vintage, if it's hand made, make sure your say it's hand made!
Pick an accurate category for your item so that it is easier to search for!

Choose a currency based on where you are located in the world! Then fill in the title of your item. Give an accurate "condition" of the garment as well. 
There is lots to fill in so try to fill as much of it out as possible, as accurately as you can. It makes it easier for people to find your items! 
Lastly, you are going to upload some of those great photos you took and then you are going to give a detailed description of what you are selling! You will then post it! There are lots of options of how to sell. You will have to choose based on your preferences. You can also set minimum reserves so that you will never get less than that minimum value and so on. 

Next we will list some items on Etsy!